Replicated Quick Start
Welcome! This topic provides an onboarding workflow and a feature checklist to help you get started with the Replicated Platform. For more information about Replicated, see Introduction to Replicated.
The goals of this topic are to introduce new Replicated users to the following common tasks so that they can successfully onboard their application to the Replicated Platform:
- Working with applications, channels, releases, and customers in the Replicated Vendor Portal and Replicated CLI
- Testing and iterating on releases by installing in a development environment
- Integrating key Replicated features and functionality with an application
Best Practices and Recommendations
The following are Replicated's best practices and recommendations for successfully onboarding:
-
If you are relatively new to Kubernetes or Helm, start with a basic tutorial. For example, see 10 Helm Tutorials to Start your Kubernetes Journey or Tutorials in the Kubernetes documentation.
-
When integrating new Replicated features with an application, make changes in small iterations and test frequently by installing or upgrading the application in a development environment. This will help you to more easily identify issues and troubleshoot.
-
Try creating and managing releases with both the Vendor Portal and the Replicated CLI. For more information, see Installing the Replicated CLI.
-
Ask for help from the Replicated community. For more information, see Get Help from the Community.
-
Replicated also offers labs in Instruqt that provide a hands-on introduction to working with Replicated features, without needing your own sample application or development environment. To complete one or more labs before you begin the onboarding workflow, see:
- Distributing Your Application with Replicated: Learn how to quickly get value from the Replicated Platform for your application.
- Avoiding Installation Pitfalls: Learn how to use preflight checks to avoid common installation issues and assure your customer is installing into a supported environment.
- Closing the Support Information Gap: Learn how to use support bundles to close the information gap between your customers and your support team.
Prerequisites
Before you begin, complete the following prerequisites:
-
This workflow assumes that you have a Helm chart that you can install and develop against. Replicated strongly recommends that all vendors distribute their application as a Helm chart because many enterprise users expect to be able to install using Helm.
You can use your own application chart or a sample chart. If you want to use a sample chart, Replicated recommends that you run the following Helm CLI command to create a new
replicated-onboardingfolder with a basic NGINX deployment:helm create replicated-onboardingFor more information, see Helm Create in the Helm documentation.
Alternatively, more advanced users can also use one of the following open source Helm charts:
-
helm pull --untar oci://registry-1.docker.io/bitnamicharts/gitea -
helm pull --untar oci://registry-1.docker.io/bitnamicharts/mediawiki -
helm pull --untar oci://registry-1.docker.io/bitnamicharts/wordpress
noteIf you do not intend to distribute a Helm application with Replicated, see Install with KOTS in an Existing Cluster to follow an onboarding workflow that uses a sample application with Kubernetes manifests and demonstrates installing with Replicated KOTS.
-
-
You must have kubectl access to a cluster where you can develop against the Helm chart. Replicated recommends that you confirm that you can successfully install the chart in the cluster and also log in to the application UI. After you confirm that you can install and access the application, uninstall it before proceeding to the onboarding workflow. For more information, see Helm Install and Helm Uninstall in the Helm documentation.
Workflow
This onboarding workflow provides steps for using the Replicated Platform to create releases for a Helm chart-based application, then using the Helm CLI to install in a development environment.
You will repeat these same basic steps to create and test releases throughout the onboarding process to test Replicated features. You will also repeat these steps after onboarding whenever you need to integrate new Replicated features with your application.
To begin onboarding to the Replicated Platform with a Helm chart:
-
Create an account in the Vendor Portal. You can either create a new team or join an existing team. For more information, see Creating a Vendor Account.
-
Create a new application:
-
In the Vendor Portal, from the application drop down, click Create new app...
-
In the Name your application field, enter a name based on the Helm chart that you will use for onboarding. For example, "Wordpress Test" or "MediaWiki Onboarding".
-
-
Create a release for the application:
-
In the Vendor Portal, click Releases > Create release.
noteIf a drop down is displayed, click Create Helm-only release.
-
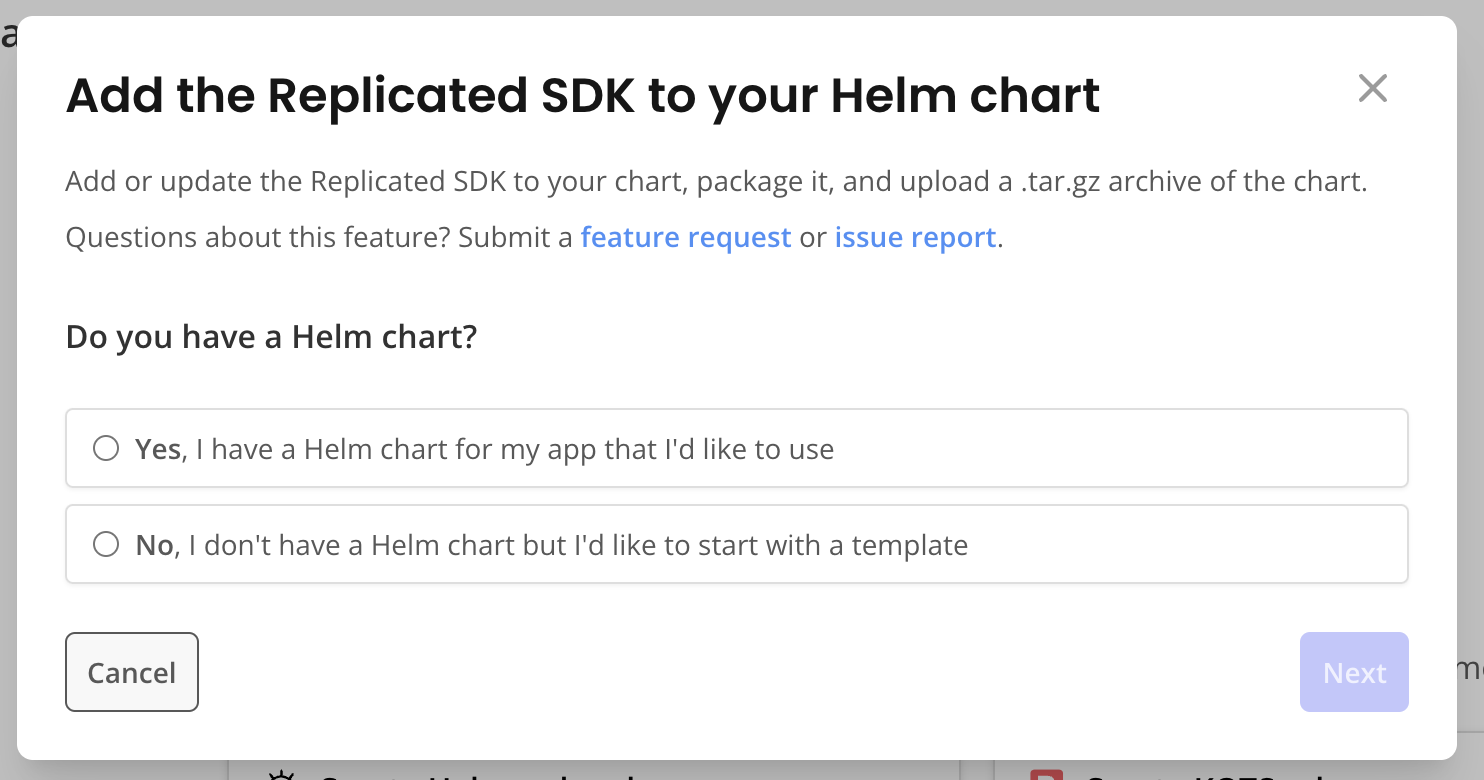
In the Add the Replicated SDK to your Helm chart dialog, click Yes, I have a Helm chart for my app that I'd like to use, and then click Next.
-
Follow the steps in the dialog to add the Replicated SDK, package the chart to a
.tgz, and then upload the.tgz: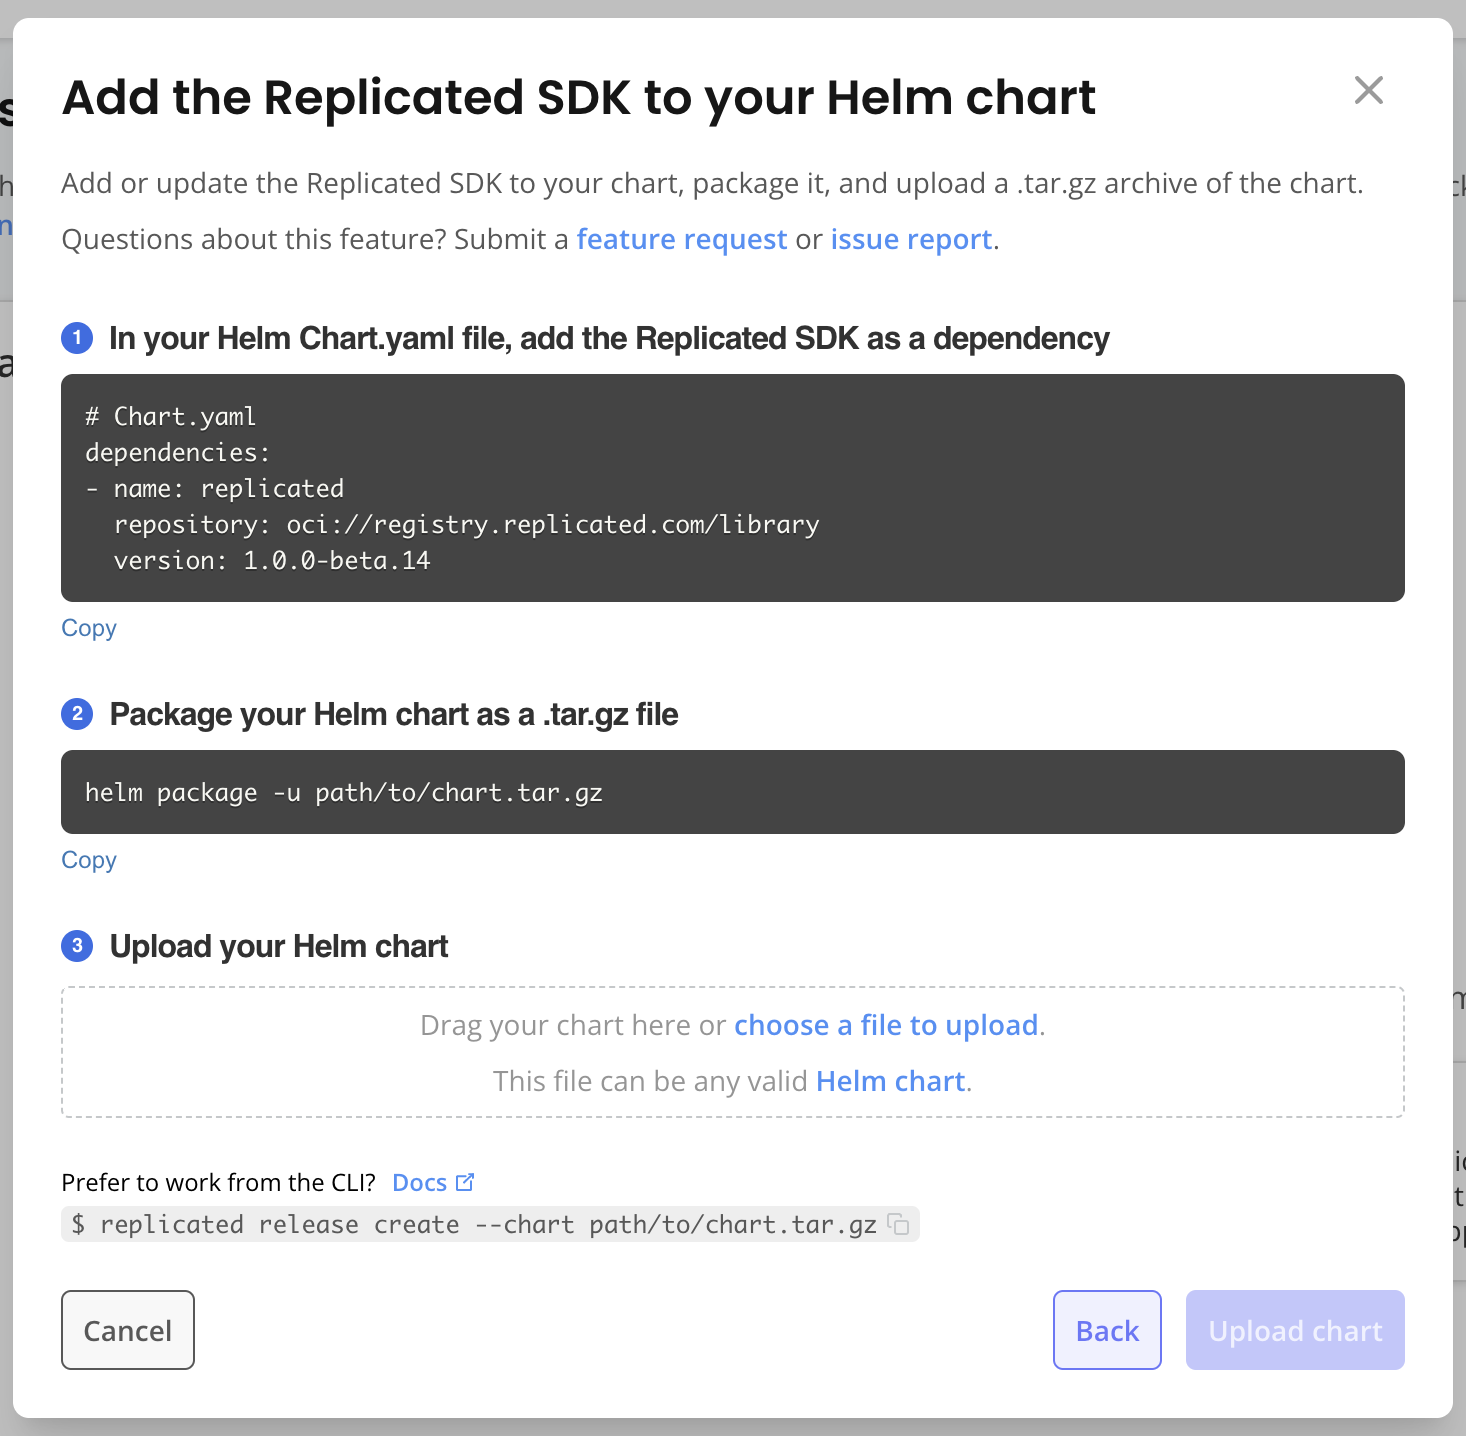
View a larger version of this image
The following describes the steps in the dialog:
-
In the Helm chart
Chart.yaml, add the Replicated SDK as a dependency:# Chart.yaml
dependencies:
- name: replicated
repository: oci://registry.replicated.com/library
version: 1.0.0-beta.25For the latest version information for the Replicated SDK, see the replicated-sdk repository in GitHub.
The Replicated SDK is a Helm chart that provides access to Replicated features and can be installed as a small service alongside your application. For more information, see About the Replicated SDK (Beta).
-
Update dependencies and package the chart as a
.tgzfile:helm package -u PATH_TO_CHARTWhere:
-uor--dependency-updateis an option for thehelm packagecommand that updates chart dependencies before packaging. For more information, see Helm Package in the Helm documentation.PATH_TO_CHARTis the path to the Helm chart in your local directory. For example,helm package -u ..
The Helm chart, including any dependencies, is packaged and copied to your current directory in a
.tgzfile. The file uses the naming convention:CHART_NAME-VERSION.tgz. For example,postgresql-8.1.2.tgz. -
Under Upload your Helm chart, drag and drop the Helm chart
.tgzfile that you created. Click Upload chart.
-
-
On the release page, click Promote.
-
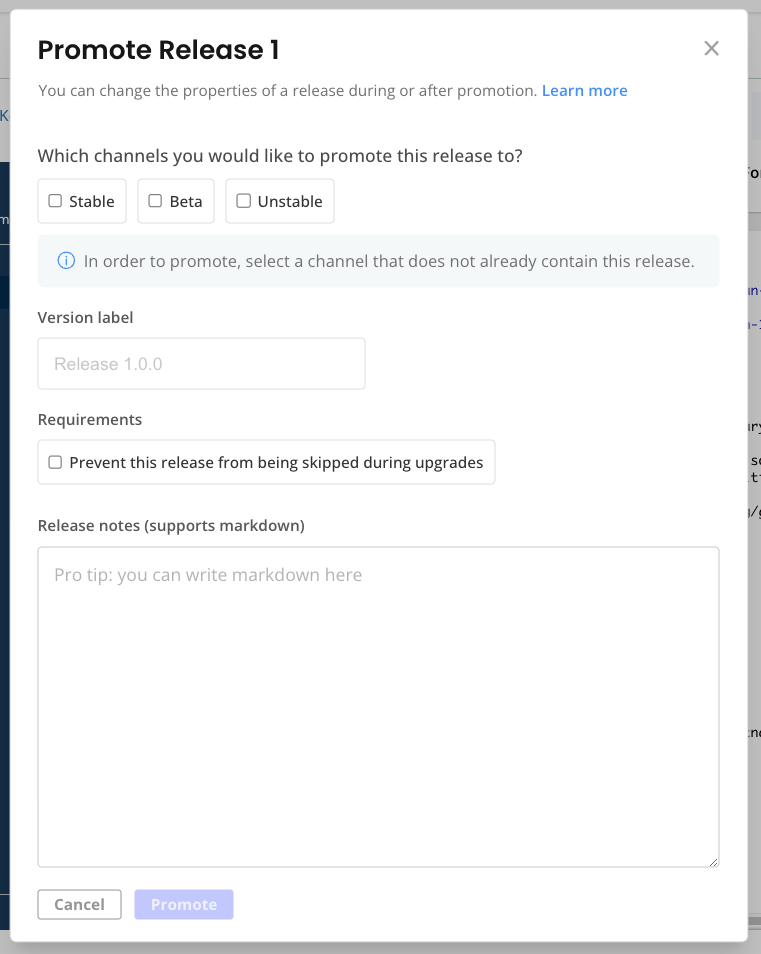
In the dialog, for Which channels you would like to promote this release to? select Unstable. Unstable is a default channel that is intended for use with internal testing.
-
Click Promote.
noteYou can ignore any error messages in the Promote Release dialog.
-
-
Create a customer so that you can install the release in your cluster:
-
Click Customer > Create customer.
-
For Customer name, add a name.
-
For Channel, select Unstable. This allows the customer to install releases promoted to the Unstable channel.
-
For Customer email, enter an email address. An email address is required for Helm installations to authenticate with the Replicated registry. This email address is never used to send emails to customers.
-
Click Save Changes.
For more information, see Creating and Managing Customers.
-
-
Install the application:
-
On the Customers page for the customer that you created, click Helm install instructions.

-
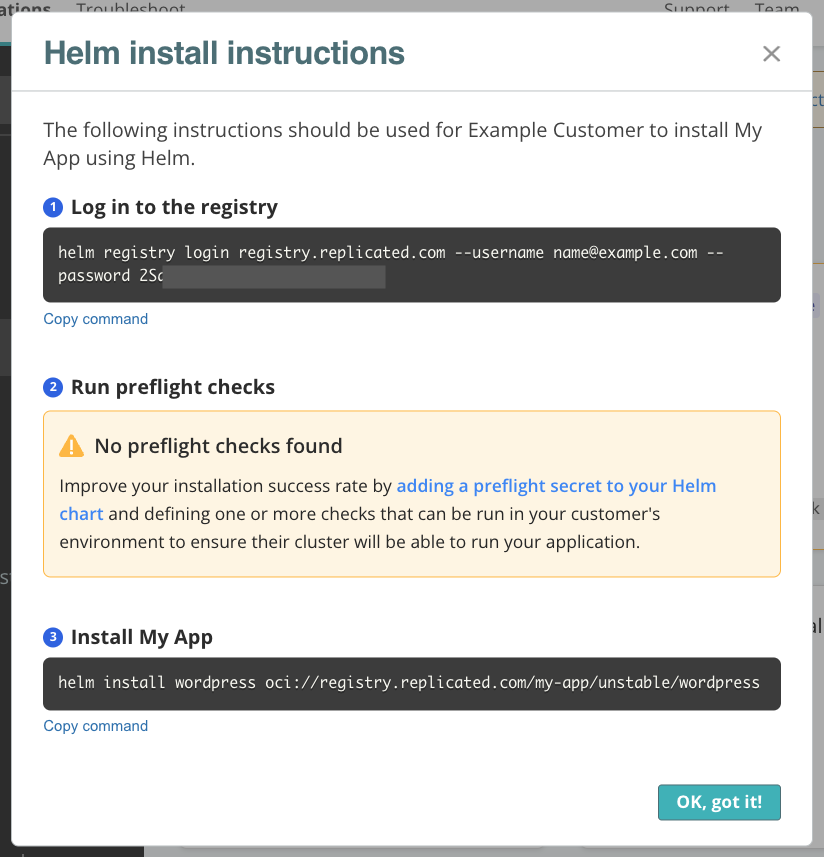
Run the commands in the Helm install instructions dialog to log in to the registry and install the Helm chart. Skip the step to run preflight checks.
 note
noteIgnore the No preflight checks found warning, if one is displayed in the dialog. This warning appears because there are no specifications for preflight checks in the Helm chart archive. You will add preflight checks later in the onboarding process.
-
After you install, in the Vendor Portal, go to Customers. Under the name of the customer, confirm that you can see an active instance.
Example:
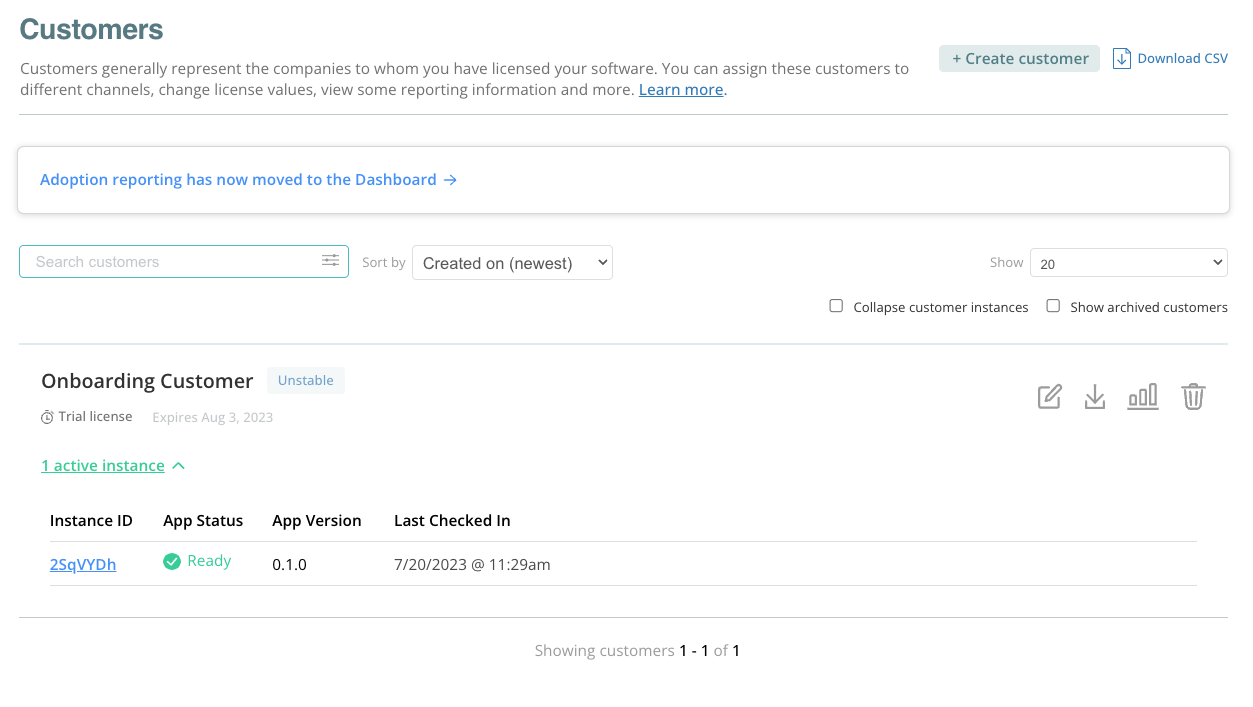
This instance telemetry is automatically collected and sent back to the Vendor Portal when the Replicated SDK is installed alongside the application. For more information, see About Instance and Event Data.
-
Under Instance ID, click on the ID to view additional insights including the versions of Kubernetes and the Replicated SDK running in the cluster where you installed the application. For more information, see Instance Details.
-
-
Create a new release in the Vendor Portal and then upgrade the instance in the cluster:
-
Make a small change in the chart, such as incrementing the semantic version in the
Chart.yamlto a new version. Then, package the chart again. -
In the Vendor Portal, create a new release (Releases > Create release). Drag and drop the new chart
.tgzand then promote the new release to the Unstable channel. -
In your cluster, run
helm upgradeto upgrade the instance to the new release that you just promoted. Thehelm upgradecommand is the same as the command you used forhelm installin a previous step, replacinginstallwithupgrade.Example:
helm upgrade wordpress oci://registry.replicated.com/my-app/unstable/wordpressSee Helm Upgrade in the Helm documentation.
-
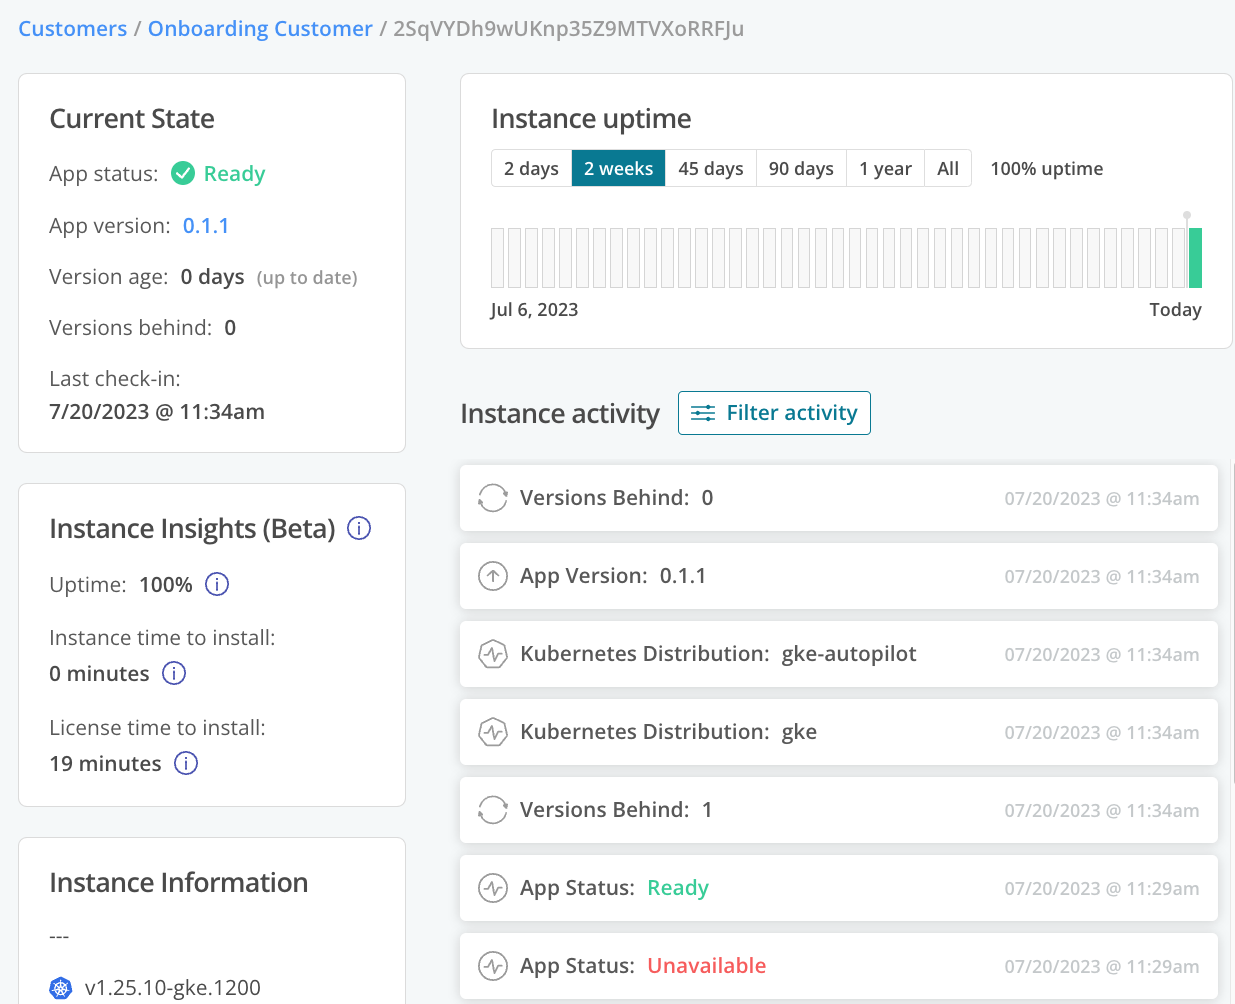
After the upgrade completes, return to the Instance details page in the Vendor Portal and confirm that you can see the new application version.
Example:
-
-
Now that you are familiar with the workflow of creating and installing releases, repeat step 8 to integrate and test new Replicated features with the application. Integrate one feature at a time by creating a release and then upgrading in a development environment to test. For the list of recommended features to integrate, see Features Checklist below.
-
(Recommended) Finish setting up your Vendor Portal account and team:
-
If you are an admin, invite and manage team members. See Invite Members in Managing Team Members.
-
Set up Slack or email notifications to be notified when there are changes in the installed instances of your application. Notifications can help catch problems before they happen and let you proactively contact customers to prevent support cases. See Configuring Instance Notifications.
-
Features Checklist
This section provides a checklist of key Replicated features to integrate with your application to fully onboard onto the Replicated Platform. These features are provided in a suggested order, though you can configure and test the features in any order.
| Feature | Description | How to |
|---|---|---|
| Proxy registry | Allow customer licenses to grant proxy access to your application's private images. Configuring the proxy registry allows you to pull your images so that you can test your deployment. Estimated time: 1 to 2 hours to connect your external registry and update your Helm chart to deliver image pull secrets for the proxy registry | Proxying Images for Helm Installations |
| Preflight checks | Define preflight checks to test for system compliance during the installation process and reduce the number of support escalations. Estimated time: 30 minutes to define and test one or more collectors and analyzers for your application | |
| Support bundles | Add a support bundle spec to enable customers to quickly collect and analyze troubleshooting data from their clusters to help you diagnose problems with application deployments. Estimated time: 30 minutes to define and test one or more collectors and analyzers for your application | |
| Custom license entitlements | Configure custom license fields that are specific to a customer, such as limiting the number of active users permitted. Estimated time: 30 minutes to create and test each entitlement | Managing Custom License Fields |
| Pre-installation license entitlement checks | Add checks for customer license entitlements before installation. Estimated time: 1 hour to integrate pre-installation license checks into your application, plus more time to test and iterate | Checking Entitlements in Helm Charts Before Deployment |
| Runtime license entitlement checks with the SDK API | Use the SDK API to add checks for customer license entitlements during runtime. To get started, use the SDK in integration mode to develop locally without needing to make real changes in the Vendor Portal or in your environment. Estimated time: 1 hour to integrate pre-installation license checks into your application, plus more time to test and iterate | |
| License field signature validation | Verify the signatures of license fields when you check customer entitlements in your application. Estimated time: 2 hours, including time to add entitlement checks in your application if you have not already | Verifying License Field Signatures with the Replicated SDK API |
| Custom metrics with the SDK API | Use the SDK API to send custom metrics that measure instances of your application running in online or air gap environments. To get started, use the SDK in integration mode to develop locally without needing to make real changes in the Vendor Portal or in your environment. Estimated time: 30 minutes to create mock data and test the endpoints locally with integration mode, plus more time to integrate with your application | Configuring Custom Metrics |
| Custom domains | Configure custom domains to alias the Replicated endpoints that are used for customer-facing URLs, such as Estimated time: 30 minutes, plus up to 24 hours to create and verify the CNAME record in your DNS account. | Using Custom Domains |
| Integrate with CI/CD | Update your existing development and release CI/CD pipelines to automatically complete tasks such as creating and promoting releases, provisioning clusters to test installation with the Replicated Compatibility Matrix, installing releases in test environments, and more. Estimated time: 1 to 2 hours to configure your CI pipeline using Replicated CLI commands or Replicated GitHub Actions. | |
| Application update checks with the SDK API | Use the SDK API to allow your users to easily check for available updates from your application.. To get started, use the SDK in integration mode to develop locally without needing to make real changes in the Vendor Portal or in your environment. Estimated time: 1 hour to mock endpoints locally with integration mode, plus more time to optionally integrate with your application | |
| Replicated KOTS | For vendors with access to the KOTS installer, add custom resources to your release to support KOTS installations. Estimated time: 1 to 2 hours to configure and test each custom resource. |
Get Help from the Community
The Replicated community site is a forum where Replicated team members and users can post questions and answers related to working with the Replicated Platform. It is designed to help Replicated users troubleshoot and learn more about common tasks involved with distributing, installing, observing, and supporting their application.
Before posting in the community site, use the search to find existing knowledge base articles related to your question. If you are not able to find an existing article that addresses your question, create a new topic or add a reply to an existing topic so that a member of the Replicated community or team can respond.
To search and participate in the Replicated community, see https://community.replicated.com/.